Handwriting and Recording Ideas

Handwriting is a complex task. It involves visual processing, visual motor integration, memory, task initiation, motor control, motivation, and more!
Sometimes we get hung up on a child’s pencil grip, but there are more effective interventions than just trying to change pencil grip.
Practice makes progress!
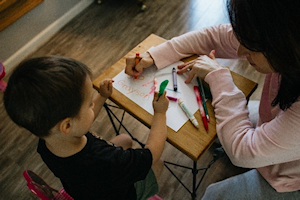
Why does practice matter?
Neuroscience tells us that despite what most people think, it is pretty much impossible to multitask when we are engaging in activities! If we're concentrating on our handwriting, we probably can't concentrate too much on what we are trying to say with our writing or listen well when taking notes. We need the brain power to focus on the composition of writing and working memory. The more that we practice, the easier this gets!
Skills for handwriting
Handwriting is a complex task and requires lots of skills including the below:
- Fine Motor skills
- Postural skills
- Visual skills
- Hearing
- Memory
- Concentration & Attention
- Spelling … and many more!
Before you start:
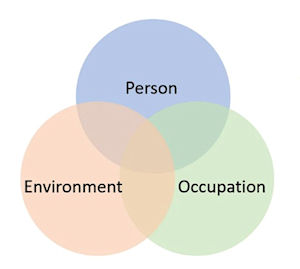
The PEO model (Law et al 1996) is a useful tool that can be used when problems arise. When problems arise, it is useful to explore three elements:
Person:
What are the skills of the child or young person? What are their abilities? What are their likes and dislikes? What is their motivation?
Activity:
What is required? Can it be broken down into smaller steps? Is there anything that can be changed or adapted?
Environment:
When and with who is the activity taking place?
Posture
First, it is important to consider whether they sitting in a good position for writing:
- Check that feet are resting comfortably on the floor.
- Hips should be all the way back on the chair.
- Table should be at elbow height, so forearms can comfortably rest.
- Are they being encouraged to use their dominant hand when writing? Are they using their non-dominant hand to hold the piece of paper steady on the table?
Grip

The most important thing is that the child is able to achieve a pencil grasp that is functional. Whilst a tripod grasp is considered to be the most effective grasp for handwriting, some children will find different ways of grasping their pencil which can work just as well.
- Grip is only one component of handwriting, and it is only a problem if it impacts on legibility or speed.
- Most children will naturally develop a pencil grip that’s comfortable for them.
- It is difficult to change grip after the age of 7 years.
- If their grip is not functional, try modelling to them i.e. showing them an alternative way they could hold their pen/pencil. You can ask them to copy you or show them an image of the type of grip that you want them to try.
- There are a variety of pencil grips available to purchase which may help children to feel more comfortable when writing. However, focusing just on using these tools to help will not improve handwriting alone. Remember that what works for one child may not work for another.
Ergonomic Tools
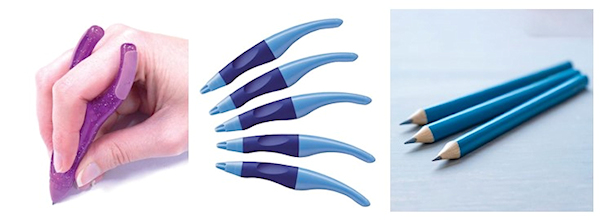
You could try using some ergonomic tools. These are a range of pens and pencils that are designed to be more comfortable and efficient and to promote proper finger placement and reduce strain. Those shown below can be purchased from this website, for example.
Pre-writing
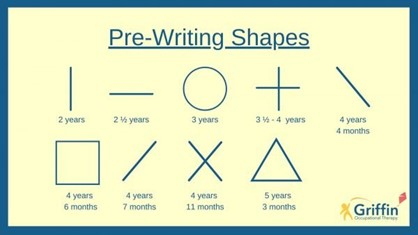
It is important children are able to complete all nine pre-writing shapes before moving on to forming letters. Of course, there are some exceptions, but most children will need to learn pre-writing marks such as below before moving on to the ABC’s! This includes being able to form vertical and horizontal lines, circles and diagonal lines.
Children are likely to engage in mark-making or scribbling before being able to produce the below shapes/lines. Children can use different tools to encourage them to engage in mark-making e.g. using paints, crayons, chalk, felt tips etc.
The graphic below is from the Griffin Occupational Therapy website. You can find out more about pre-writing shapes and how to support children to learn them on their web page.
Strategies:
- Show the child how to form the pre-writing shapes.
- Sound out the movement of the pre-writing marks e.g. “down across, up across”, providing them with verbal prompts to help them understand which direction they need to go in.
- Make it fun! – use dot to dot games or mazes.
- Use multisensory strategies e.g. writing the shapes in different textures or using different materials; write the letter/shape in the air or on the child’s back.
Letter and number formation
 Once your child can form all the pre-writing shapes, they can start focusing on letter formation. Try and teach them letters with similar movements first e.g. the “magic C group” such as below where each letter starts in the same place as a “c”:
 Strategies:
- Encourage daily practice at the right level to promote success and not frustration! The ‘Just right challenge’.
- Start by practicing upper case letters.
- Model how to form each letter before asking the child to copy you.
- Make it fun and interesting for the young person! Tap into their motivation!
- Try demonstrating how to draw a letter e.g. using chalk, then ask the child to trace this letter in order to wipe it off.
To improve handwriting...practice handwriting! There is no evidence currently to suggest that practicing fine motor skills leads to better handwriting!
Cognitive strategies
The evidence shows that using cognitive strategies is effective in handwriting interventions for children. This means that we should be using cognitive strategies when we are supporting children to learn the correct way to form letters. Using the below strategies should help make writing easier and more automatic:
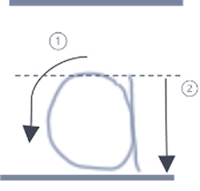
- Modelling: model how to form each letter i.e. show your child how. Show them more than once. Also model “self-talk” strategy below. Numbered arrows could be used to show correct letter formation so that children have a good visual cue about where they need to place their pen/pencil and which direction it should go in.
- Self-talk: say the letter formation script out loud while writing each letter i.e. saying “down and dot” or “around, down and across”. You should also model this i.e. say this out loud when helping your child practice. Try to use the same words/cues for each letter e.g. if practicing writing letter “a” always use “curve around and down”. Don’t worry too much about exactly what you are saying here, just coming up with the same self-talk script each time can help with their learning.
- Self-evaluation: go back and check with children if their letters look like they should. Ask them to circle their “3 best” and see if they can erase one letter and try to improve it. Help them to reflect – did they need to slow down? Did they write the letters from top to bottom? Did they write very small or big letters? Do they need to leave a finger space between words? Did they use capitals? Don’t worry about staying on the line too much in the beginning, you can focus on this more later.
- Practice! – there are lots of different worksheets you can use to help children with their letter formation e.g. as part of the ‘Printing Like a Pro’ programme.
Printing Like a Pro
‘Printing Like a Pro’ is a programme developed by an Occupational Therapist to help children learn the correct way to form each letter so that printing becomes easier and more automatic. This programme can also help to make writing neater and quicker. Please see the ‘Resources’ section below for links to further information and worksheets as part of this programme (these are also free and accessible online).

Additional Strategies
- It can be useful to use lined paper to help guide children when writing letters on paper.
- Show them how to form each letter and encourage them to copy you.
- Verbally tell them where they should start each letter.
- Give them the chance to practice regularly.
- Make it fun! Try to practice letters in line with the child’s interests, form the letter on the child’s back and ask them to guess the letter by writing it, have them trace a letter in the air with their ‘magic paintbrush’ and guess what it is.
- Help them associate meaning to the letters – it is not that fun just to write the letter “a”, but maybe it is fun if they are matching this letter to images or playing a game e.g. trying to think of an object that begins with that letter, or verbally encouraging them e.g. “wow A for Adam” or “A for apple, you like apples!” etc.
- If they appear to find writing using a paper and pencil difficult initially, try using a whiteboard which might be easier for them to write on. Alternatively, some children will prefer using different textures e.g. using sandpaper.
- Try using stencils or worksheets to help them in tracing letters before moving on to copying and then forming letters.
It is important to give children lots of opportunity to engage in drawing tasks – this could involve colouring in, drawing or using tracing worksheets.

How much and how often?
- You should aim to practice three to five times per week for 20 minutes.
- Sessions could be broken down into 10-minute segments or shorter if needed.
- Daily handwriting practice i.e. engaging in practice little and often, can also help if children have difficulty focusing on the task of handwriting for this long.
- Remember every child is different! Some children will benefit from more focused sessions where they engage for 20 minutes, and others may be too distracted or find this boring. It is important to find what works for the child, as long as they are engaging in some practice that is the main thing!
- If fatigue when writing appears to be a problem, you could try helping them to practice writing one sentence that includes all letters in the alphabet (as below), helping them to have practice writing each letter without needing to write lots of sentences.

Pressure
Too much pen pressure when writing can cause fatigue and impact on the speed of writing. Too little pressure can make the writing hard to read. The below strategies can be used if pressure is a concern:
- Use a mechanical pencil and encourage them not to press too hard or the lead will break.
- Use a weighted pencil for better sensory feedback when writing.
- Use softer leaded pencils such as 2B so writing is clearer.
- Organize a fun activity and encourage them to write the same word with light writing, and darker writing and ask them to reflect on what it felt like.

Size and Spacing
- Instead of using their finger, they could use other tools to make it more fun or by using stickers between words.
- Use standard highlighters or lined paper to control the sizing.
- Coach, don’t tell! Ask questions and get them to self-reflect on their work! What do you think of the size of these letters? Are they big or small? What do you think about the spacing between these two words?
- You could try using visual prompts if helpful e.g. lollypop sticks to help with spacing or by using squared paper.
Environmental considerations
Environmental considerations Environment can often be the biggest barrier to children accessing their learning at school, including documenting their work.
There are so many things to consider:
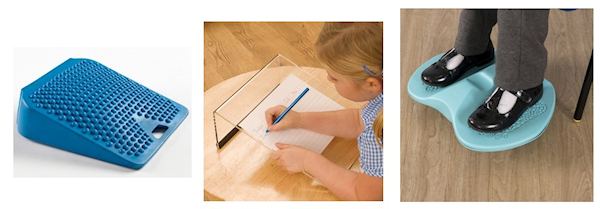
- Is the child sat at an appropriate height chair and table? Can their feet touch the floor?
- Are there any distractions in the room? Are there any smells/sounds that could be impacting them? What is the lighting like where they are writing? Are they struggling to ignore noisy peers?
- Do they need to get up and move/engage in some physical activity before sitting and focusing on writing?
- The pictures below show some tools you may want to try to support your child’s participation.
Alternatives to handwriting
As students move on and get older through primary school and then secondary school, the demands of documenting work through handwriting are bigger.
If handwriting is very effortful for the young person, and you find that it is very difficult for them to produce functional and legible handwriting, consider alternatives to handwriting such as typing.
There are a lot of touch-typing programmes online, which are free. A couple of examples are:
As with learning to write by hand, when learning to type or to touch-type, provide regular opportunities for the young person to learn before introducing this as a tool to document their work e.g. at school.
Watch this
The video below goes through additional strategies and provides some demonstrations of how you can support a child or young person with their handwriting:
Printing Like a Pro Resources
Resources as part of this programme can be accessed on this website. Some of the specific worksheets and information can be accessed via the below links:
- Printing Like a Pro – for school staff
- Printing Like a Pro – for parents and caregivers
- Upper case letter worksheets
- Lower case letter worksheets
- Numbers 0-9 worksheets
Last updated20 Jan 2025

